If you love peanut butter and crave a dessert that fits a low-carb lifestyle, this cheesecake is a keeper. It’s rich, creamy, lightly sweet, and surprisingly simple to make. You get that classic peanut butter flavor with a smooth cheesecake texture and a nutty, buttery crust.
It feels indulgent, but it’s built with keto-friendly ingredients. Whether you’re hosting friends or just want a weekend treat, this one hits the spot without the sugar crash.

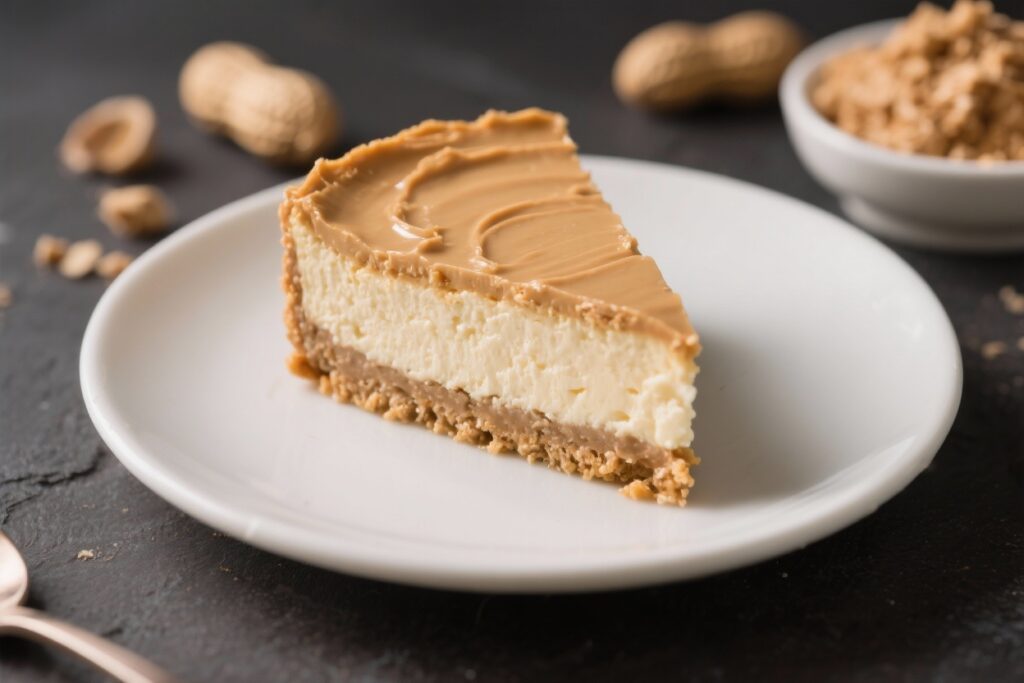
Keto Peanut Butter Cheesecake – Creamy, Low-Carb Comfort Dessert
Ingredients
Method
- Prep your pan and oven. Preheat the oven to 325°F (163°C). Line the bottom of a 9-inch springform pan with parchment and lightly grease the sides. Wrap the outside of the pan with a double layer of foil if you plan to use a water bath.
- Make the crust. In a bowl, mix almond flour, powdered sweetener, and salt. Stir in melted butter and vanilla until the mixture resembles damp sand. Press evenly into the prepared pan, going slightly up the sides.
- Par-bake the crust. Bake for 10 minutes until lightly golden. Set aside to cool while you make the filling.
- Beat the cream cheese. In a large bowl, beat the cream cheese on medium speed until smooth and fluffy, about 1–2 minutes. Scrape down the bowl to avoid lumps.
- Add peanut butter and sweetener. Beat in the peanut butter and granulated sweetener until fully combined and smooth. Scrape the bowl well, especially at the bottom.
- Blend in sour cream, vanilla, and salt. Mix just until smooth. Avoid overmixing to minimize air bubbles.
- Add the eggs. Beat in eggs one at a time on low speed, just until incorporated. Stop mixing as soon as the batter is uniform.
- Pour and smooth. Pour the filling over the cooled crust. Tap the pan gently on the counter to release any air bubbles. For the smoothest top, run a spatula in a circle to even it out.
- Bake with or without a water bath. For the most even bake and fewer cracks, place the springform pan in a larger roasting pan and pour hot water around it, halfway up the sides. Bake at 325°F for 55–70 minutes, until the edges are set and the center still jiggles slightly.
- Cool gradually. Turn off the oven, crack the door, and let the cheesecake sit inside for 45 minutes. Then remove, take off the water bath, and cool to room temperature.
- Chill to set. Cover and refrigerate for at least 6 hours, preferably overnight. This step improves both texture and flavor.
- Optional topping. Warm heavy cream to a gentle simmer. Pour over chopped chocolate and rest for 2 minutes, then stir smooth. Whisk in peanut butter until glossy. Spread over the chilled cheesecake and garnish with crushed peanuts.
- Slice and serve. Use a hot, clean knife for neat slices. Wipe between cuts for the best presentation.
What Makes This Special
This keto peanut butter cheesecake brings together classic flavors with smart swaps that keep carbs low. The almond flour crust is crisp and buttery, while the filling stays dense yet silky.
It uses a granulated and powdered low-carb sweetener for the best texture and flavor. The cheesecake sets beautifully without being overly sweet or heavy. Best of all, it’s easy to prep ahead and keeps well for days.
Ingredients
- For the crust:
- 1 1/2 cups almond flour
- 1/4 cup powdered erythritol or powdered allulose
- 1/4 teaspoon fine sea salt
- 1/4 cup unsalted butter, melted
- 1/2 teaspoon vanilla extract
- For the filling:
- 24 ounces cream cheese, softened to room temperature
- 3/4 cup creamy, no-sugar-added peanut butter (natural style, stirred smooth)
- 3/4 cup granulated erythritol or allulose
- 1/3 cup sour cream, room temperature
- 3 large eggs, room temperature
- 1 teaspoon vanilla extract
- 1/4 teaspoon fine sea salt
- Optional topping:
- 1/3 cup heavy cream
- 2 ounces sugar-free dark chocolate, chopped (or chips)
- 2 tablespoons peanut butter
- Crushed peanuts (unsalted), for garnish
Step-by-Step Instructions
- Prep your pan and oven. Preheat the oven to 325°F (163°C).
Line the bottom of a 9-inch springform pan with parchment and lightly grease the sides. Wrap the outside of the pan with a double layer of foil if you plan to use a water bath.
- Make the crust. In a bowl, mix almond flour, powdered sweetener, and salt. Stir in melted butter and vanilla until the mixture resembles damp sand.
Press evenly into the prepared pan, going slightly up the sides.
- Par-bake the crust. Bake for 10 minutes until lightly golden. Set aside to cool while you make the filling.
- Beat the cream cheese. In a large bowl, beat the cream cheese on medium speed until smooth and fluffy, about 1–2 minutes. Scrape down the bowl to avoid lumps.
- Add peanut butter and sweetener. Beat in the peanut butter and granulated sweetener until fully combined and smooth.
Scrape the bowl well, especially at the bottom.
- Blend in sour cream, vanilla, and salt. Mix just until smooth. Avoid overmixing to minimize air bubbles.
- Add the eggs. Beat in eggs one at a time on low speed, just until incorporated. Stop mixing as soon as the batter is uniform.
- Pour and smooth. Pour the filling over the cooled crust.
Tap the pan gently on the counter to release any air bubbles. For the smoothest top, run a spatula in a circle to even it out.
- Bake with or without a water bath. For the most even bake and fewer cracks, place the springform pan in a larger roasting pan and pour hot water around it, halfway up the sides. Bake at 325°F for 55–70 minutes, until the edges are set and the center still jiggles slightly.
- Cool gradually. Turn off the oven, crack the door, and let the cheesecake sit inside for 45 minutes.
Then remove, take off the water bath, and cool to room temperature.
- Chill to set. Cover and refrigerate for at least 6 hours, preferably overnight. This step improves both texture and flavor.
- Optional topping. Warm heavy cream to a gentle simmer. Pour over chopped chocolate and rest for 2 minutes, then stir smooth.
Whisk in peanut butter until glossy. Spread over the chilled cheesecake and garnish with crushed peanuts.
- Slice and serve. Use a hot, clean knife for neat slices. Wipe between cuts for the best presentation.
How to Store
- Refrigerator: Cover tightly and keep in the fridge for up to 5 days.
- Freezer: Freeze whole or in slices, well-wrapped, for up to 2 months.
Thaw overnight in the fridge.
- Make-ahead: The flavor improves after a day, so it’s perfect for prepping ahead of events.
Benefits of This Recipe
- Low-carb and satisfying: High in fat and protein, this cheesecake keeps you full without a sugar spike.
- Easy to customize: The base recipe works with different nut butters, toppings, and sweeteners.
- No grain flour: Almond flour crust delivers a pleasant crunch and keeps it gluten-free.
- Great texture: Creamy, dense, and smooth—everything a cheesecake should be.
Pitfalls to Watch Out For
- Using sweetened peanut butter: Always check the label. Added sugars will raise the carbs and can make the filling too sweet.
- Cold ingredients: Cold cream cheese or eggs can lead to lumps. Bring everything to room temperature.
- Overmixing: Too much air causes cracks.
Mix just until combined, especially after adding eggs.
- Skipping the cool-down: Rapid temperature changes can crack the top. Cool slowly in the oven first.
- Wrong sweetener texture: Powdered sweetener works best in the crust; granulated or powdered both work in the filling, but avoid crystallizing sweeteners if you notice a gritty finish.
Recipe Variations
- Chocolate swirl: Reserve 1/2 cup of filling and mix with 2 tablespoons melted sugar-free chocolate. Dollop and swirl into the top before baking.
- Peanut butter cup style: Add a thin layer of sugar-free chocolate on the crust before pouring the filling.
Top with chopped sugar-free peanut butter cups.
- Nut-Free crust: Use finely ground sunflower seed flour in place of almond flour for a similar texture.
- No-bake shortcut: Skip baking the filling. Use the same ingredients but add 1 teaspoon powdered gelatin bloomed in 2 tablespoons water, dissolved and mixed into the batter, then chill until set. Keep a baked crust for best structure.
- Swaps for sweetener: Allulose gives the smoothest texture; erythritol blends may taste slightly cooler.
Adjust to taste and start with a bit less if you prefer lightly sweet.
FAQ
Can I use crunchy peanut butter?
Yes, but expect a slightly chunky texture. For the smoothest, classic cheesecake mouthfeel, use creamy natural peanut butter. If using crunchy, give the batter an extra stir to distribute the bits evenly.
Do I have to use a water bath?
No, but it helps with even baking and reduces cracking.
If you skip it, place a pan of hot water on the rack below the cheesecake to add moisture and still get good results.
What if my cheesecake cracks?
Don’t worry. It will still taste great. Cover small cracks with the optional chocolate-peanut butter topping or whipped cream.
Next time, mix less, bake with a water bath, and cool more gradually.
How do I know when it’s done?
The edges should be set and the center should jiggle like gelatin when you gently shake the pan. If it sloshes, bake a bit longer. Remember it will continue to set as it cools.
Can I use Greek yogurt instead of sour cream?
Yes.
Full-fat Greek yogurt works well and keeps the filling creamy. If using, drain any excess liquid first and measure by volume.
Is this recipe gluten-free?
Yes, as written it’s gluten-free. Just confirm your baking ingredients and chocolate are certified gluten-free if that’s important for your needs.
What’s the best way to slice cleanly?
Use a sharp knife dipped in hot water and wiped dry before each cut.
Slice straight down and avoid dragging the knife to keep edges smooth.
Can I substitute almond butter?
Absolutely. Use the same amount of unsweetened almond butter. The texture stays similar and the flavor becomes slightly more delicate and toasty.
Final Thoughts
This Keto Peanut Butter Cheesecake is a reliable, crowd-pleasing dessert that fits your goals without feeling like a compromise. With simple ingredients and a few smart techniques, you’ll get a creamy, rich slice every time. Keep the basics in mind—room temperature ingredients, gentle mixing, and a slow cool—and the rest is easy. Whether for a special dinner or a weekday treat, this recipe earns a permanent spot in your rotation.


Printable Recipe Card
Want just the essential recipe details without scrolling through the article? Get our printable recipe card with just the ingredients and instructions.