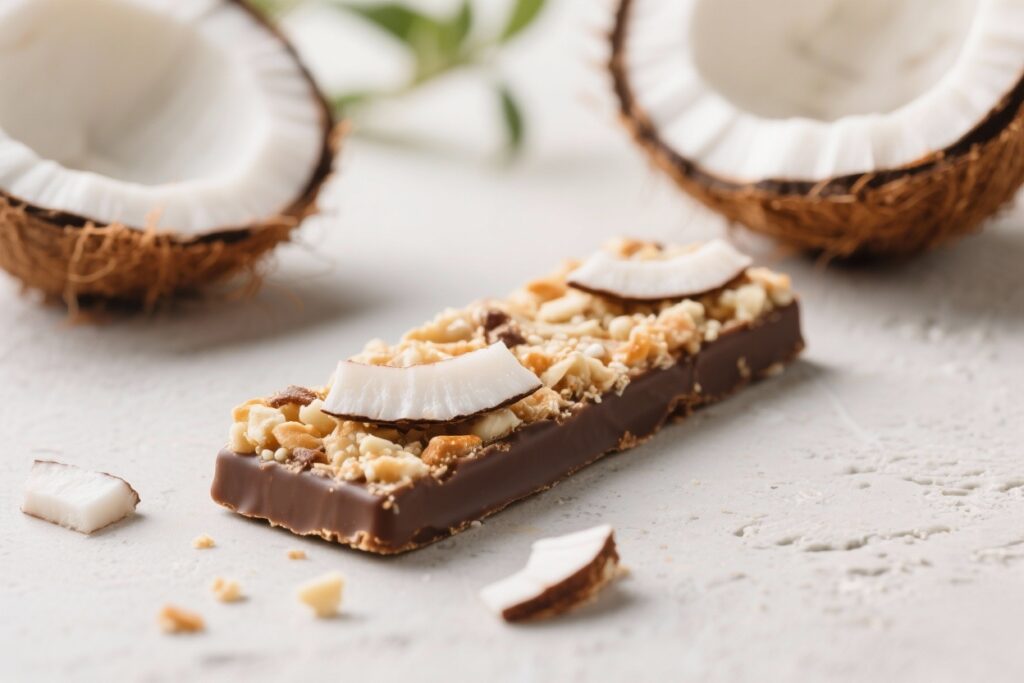
If you love coconut and want a sweet snack that won’t derail your low-carb goals, this Keto Coconut Bar hits the spot. It’s creamy, slightly chewy, and naturally rich without being heavy. Think of it like a coconut macaroon meets a candy bar, but made with clean, keto-friendly ingredients.
You don’t need fancy equipment or special skills, just a mixing bowl and a pan. Make a batch on Sunday, and you’ll have a grab-and-go treat all week.

Ingredients
Method
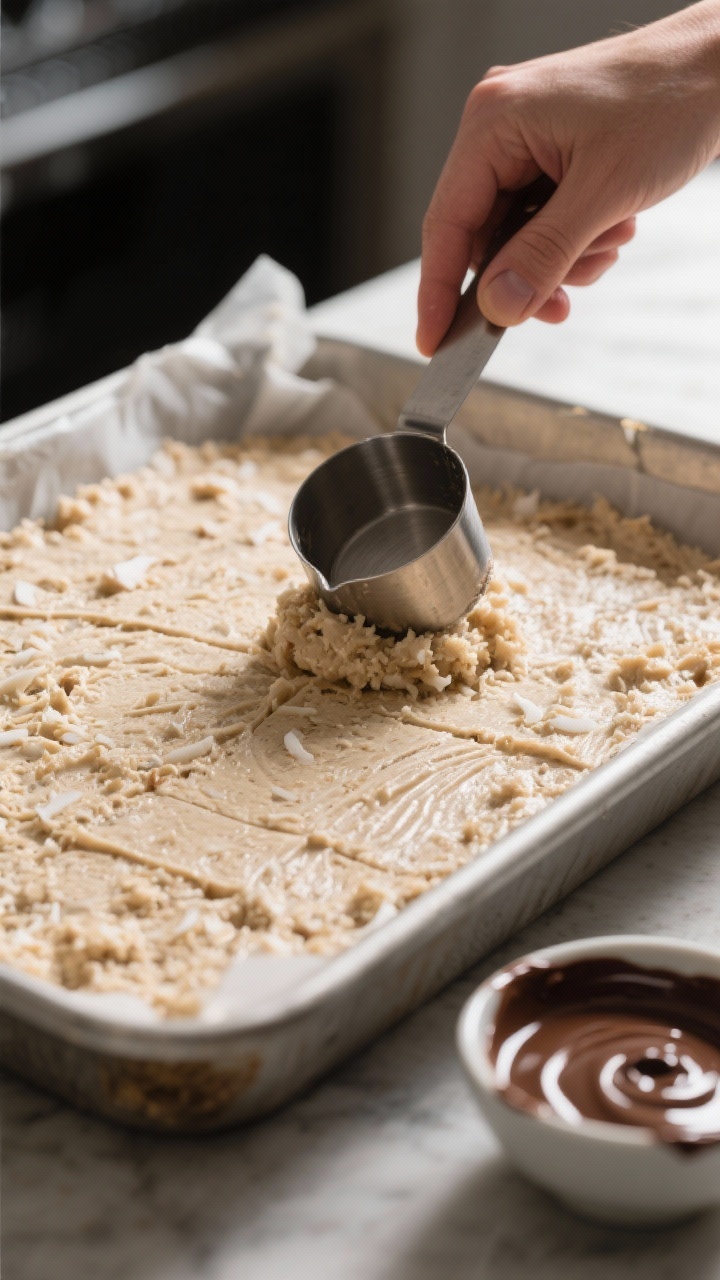
- Prepare the pan: Line an 8x8-inch baking pan with parchment paper, leaving an overhang for easy lifting. Lightly grease the parchment if you want cleaner edges.
- Mix the dry ingredients: In a large bowl, combine 2 1/2 cups unsweetened shredded coconut, 1/2 cup super-fine almond flour, and a pinch of sea salt. Stir to distribute evenly.
- Sweeten and bind: In a separate bowl, whisk together 1/2 cup powdered sweetener, 1 teaspoon vanilla extract, 1/3 cup melted coconut oil, and 1/2 cup thick coconut cream. Whisk until smooth and glossy.
- Combine: Pour the wet mixture over the dry. Stir with a spatula until the coconut is fully coated and the mixture holds together when pressed. If it’s too dry, add 1–2 tablespoons more coconut cream. If too wet, sprinkle in a bit more almond flour.
- Press into pan: Transfer the mixture to the lined pan. Press firmly and evenly using the back of a measuring cup. Compact the layer well so the bars slice cleanly.
- Chill to set: Refrigerate for 30–45 minutes until firm to the touch.
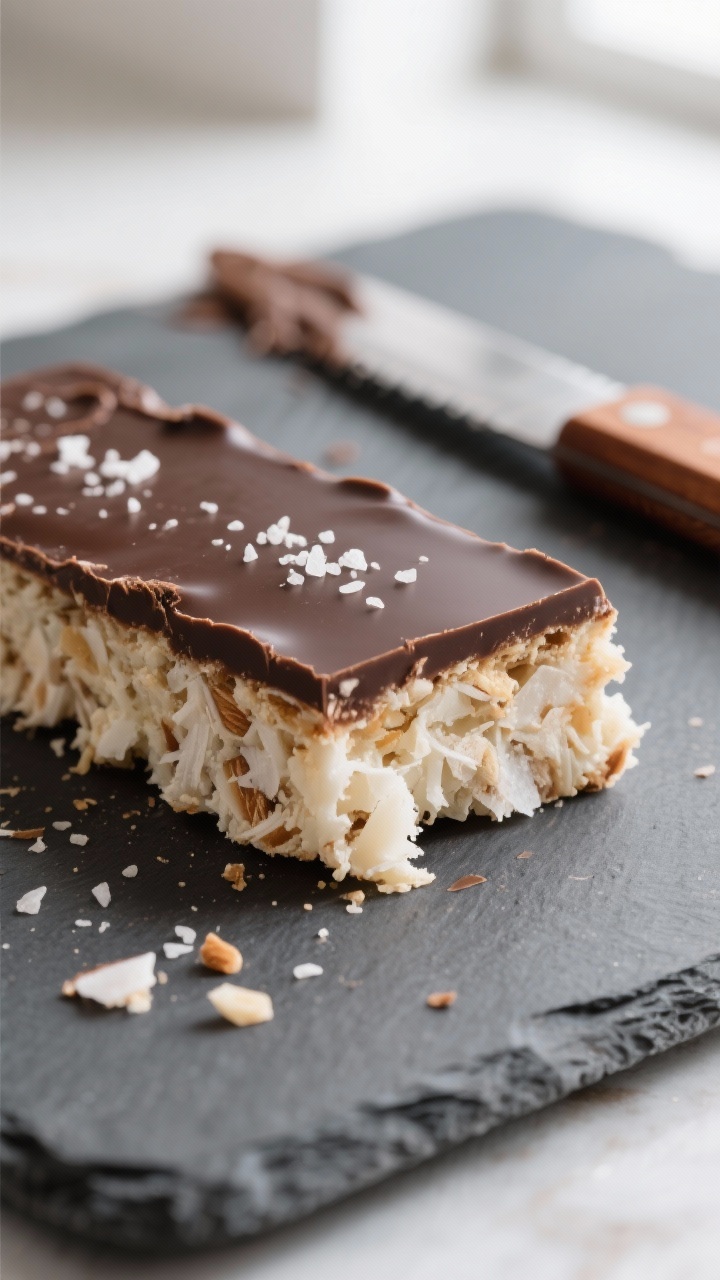
- Make the chocolate topping: Melt 5–6 ounces of dark or sugar-free chocolate with 1 tablespoon coconut oil in a heatproof bowl over barely simmering water (or microwave in 20-second bursts). Stir until smooth.
- Finish the bars: Pour the melted chocolate over the chilled coconut layer. Tilt the pan to spread evenly. Sprinkle with a pinch of sea salt or extra coconut flakes if you like.
- Final chill: Return to the fridge for 30–60 minutes, until the chocolate is set but not rock hard.
- Slice and serve: Lift the slab using the parchment. Let it sit at room temp for 5–10 minutes to prevent the chocolate from cracking. Use a sharp knife, warmed under hot water and dried, to cut into 12–16 bars.
What Makes This Special
This bar keeps carbs low by using unsweetened coconut and a sugar-free sweetener, but it still tastes indulgent. There’s no baking required, which makes it quick and very beginner-friendly.
The texture is the star: a soft coconut center with a gentle bite, finished with a thin dark chocolate layer. It also scales well—double the recipe for a crowd or keep it small for a personal stash. And because it’s high in fat and fiber, it’s surprisingly filling.
Shopping List
- Unsweetened shredded coconut (finely shredded works best)
- Coconut cream or full-fat canned coconut milk (chilled; use the thick cream)
- Coconut oil (refined for a neutral flavor, unrefined for stronger coconut taste)
- Almond flour (super-fine)
- Powdered erythritol, allulose, or a blend (powdered dissolves better)
- Vanilla extract
- Sea salt
- Dark chocolate (sugar-free, 85%+ cocoa, or keto chocolate chips)
- Optional: unsweetened coconut flakes for topping
- Optional: chopped almonds or macadamias for crunch
Instructions

- Prepare the pan: Line an 8×8-inch baking pan with parchment paper, leaving an overhang for easy lifting.
Lightly grease the parchment if you want cleaner edges.
- Mix the dry ingredients: In a large bowl, combine 2 1/2 cups unsweetened shredded coconut, 1/2 cup super-fine almond flour, and a pinch of sea salt. Stir to distribute evenly.
- Sweeten and bind: In a separate bowl, whisk together 1/2 cup powdered sweetener, 1 teaspoon vanilla extract, 1/3 cup melted coconut oil, and 1/2 cup thick coconut cream. Whisk until smooth and glossy.
- Combine: Pour the wet mixture over the dry.
Stir with a spatula until the coconut is fully coated and the mixture holds together when pressed. If it’s too dry, add 1–2 tablespoons more coconut cream. If too wet, sprinkle in a bit more almond flour.
- Press into pan: Transfer the mixture to the lined pan.
Press firmly and evenly using the back of a measuring cup. Compact the layer well so the bars slice cleanly.
- Chill to set: Refrigerate for 30–45 minutes until firm to the touch.
- Make the chocolate topping: Melt 5–6 ounces of dark or sugar-free chocolate with 1 tablespoon coconut oil in a heatproof bowl over barely simmering water (or microwave in 20-second bursts). Stir until smooth.
- Finish the bars: Pour the melted chocolate over the chilled coconut layer. Tilt the pan to spread evenly.
Sprinkle with a pinch of sea salt or extra coconut flakes if you like.
- Final chill: Return to the fridge for 30–60 minutes, until the chocolate is set but not rock hard.
- Slice and serve: Lift the slab using the parchment. Let it sit at room temp for 5–10 minutes to prevent the chocolate from cracking. Use a sharp knife, warmed under hot water and dried, to cut into 12–16 bars.
How to Store
Keep the bars in an airtight container in the refrigerator for up to 10 days.
For longer storage, freeze them for up to 2 months. Place parchment between layers to avoid sticking. When serving from frozen, let them sit at room temperature for 10–15 minutes for the best texture.
Why This is Good for You
- Low in net carbs: Using unsweetened coconut, almond flour, and a sugar-free sweetener keeps carbs minimal.
- Healthy fats: Coconut and dark chocolate help with satiety, making it easier to stay on track with keto or low-carb goals.
- Fiber-rich: Shredded coconut brings fiber that supports digestion and stable energy.
- No refined sugar: You control sweetness without a blood sugar spike, especially if you choose allulose or erythritol.
- Easy portion control: Pre-cut bars make it simple to enjoy a small, satisfying treat.
Common Mistakes to Avoid
- Using sweetened coconut: It adds sugar and throws off the keto balance.
Always check the label.
- Too dry or too wet mixture: The mixture should press together firmly. Adjust with a touch of coconut cream (if dry) or almond flour (if wet).
- Skipping the chill times: Rushing leads to crumbly bars and cracked chocolate. Let each layer set properly.
- Cutting while too cold: Ice-cold chocolate shatters.
Warm the knife and let the slab sit a few minutes before slicing.
- Overheating chocolate: It can seize or become grainy. Melt gently and stir often.
Alternatives
- Dairy-free: The base is already dairy-free. Just pick a dairy-free sugar-free chocolate.
- No almond flour: Swap with finely ground coconut flour, but use less (start with 2–3 tablespoons) and adjust with extra coconut cream as needed.
- Nutty crunch: Fold in 1/3 cup chopped almonds, pecans, or macadamias for texture.
- Flavor twist: Add 1/2 teaspoon almond extract or a splash of coconut extract for a bakery-style aroma.
- Extra protein: Mix in 1–2 scoops unflavored or vanilla whey isolate.
If it dries the mixture, add more coconut cream by the tablespoon.
- Different sweeteners: Allulose gives a softer bite and no cooling effect. Erythritol blends can feel a bit cooler on the tongue. Powdered forms dissolve best.
- Bars without chocolate: Skip the topping and press toasted coconut flakes on top before chilling for a lighter version.
FAQ
Can I make these without coconut oil?
Yes.
Replace the coconut oil with unsalted butter (if you’re not dairy-free) or cacao butter for a firmer set and a subtle white-chocolate vibe. Adjust sweetness to taste since cacao butter is less sweet.
What’s the best pan size if I don’t have 8×8?
A 9×5-inch loaf pan works for thicker bars, or a 9×9 for thinner ones. Line with parchment and keep an eye on thickness so the base compacts well.
Do I need to toast the coconut first?
Optional, but toasting adds a deeper flavor.
If you do, toast gently in a dry skillet over medium heat, stir often, and cool before mixing to avoid melting the base prematurely.
How many carbs are in each bar?
It varies by brand and slice size, but a typical bar (out of 16) with sugar-free chocolate is roughly 2–4g net carbs. Check your labels and calculate based on your ingredients.
Can I make them vegan?
They already are, as long as your chocolate is dairy-free. Use coconut cream instead of dairy cream and plant-based sweeteners.
Why did my chocolate separate from the coconut layer?
The base may not have been fully chilled, or there was moisture on the surface.
Pat the base dry if needed and chill until firm before adding chocolate. Let bars sit a few minutes before cutting to reduce cracking and separation.
Can I use desiccated coconut instead of shredded?
Yes, but it absorbs moisture differently. Start with a little less and add more coconut cream as needed until the mixture holds together when pressed.
How do I prevent the cooling effect from erythritol?
Use a blend with allulose or monk fruit, or switch to allulose entirely.
Powdered forms help reduce grittiness and cooling.
In Conclusion
These Keto Coconut Bars deliver a sweet, coconut-forward treat with minimal effort and maximum payoff. They set up quickly, slice cleanly, and store well for days. Customize the sweetness, add crunch, or keep them simple and smooth. However you make them, they’re a reliable, low-carb dessert that tastes like a classic candy bar—minus the sugar.

Printable Recipe Card
Want just the essential recipe details without scrolling through the article? Get our printable recipe card with just the ingredients and instructions.