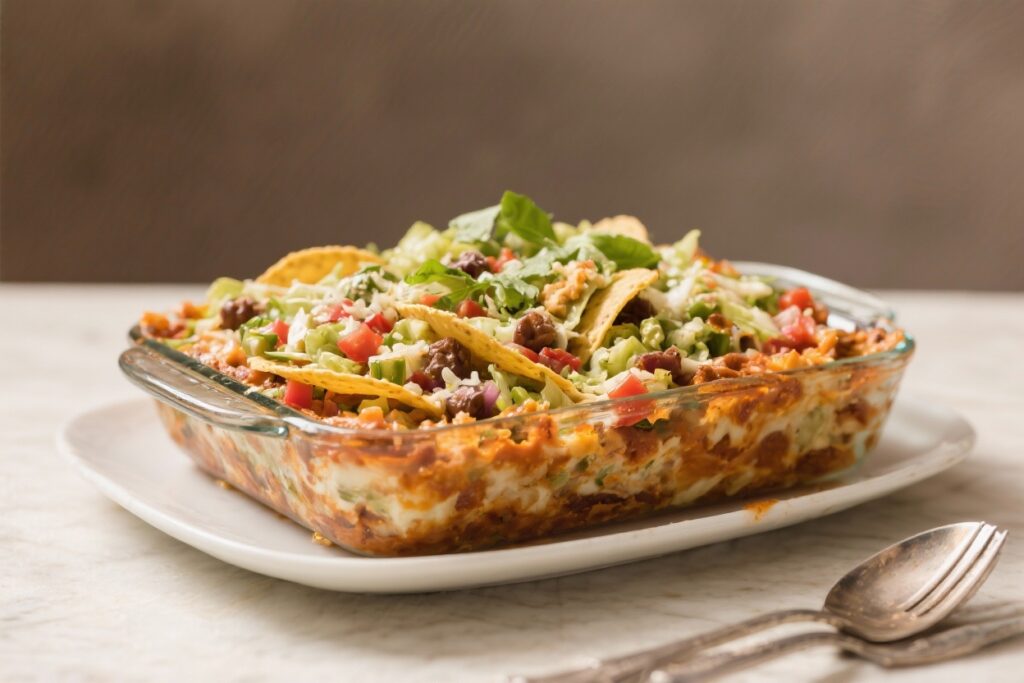
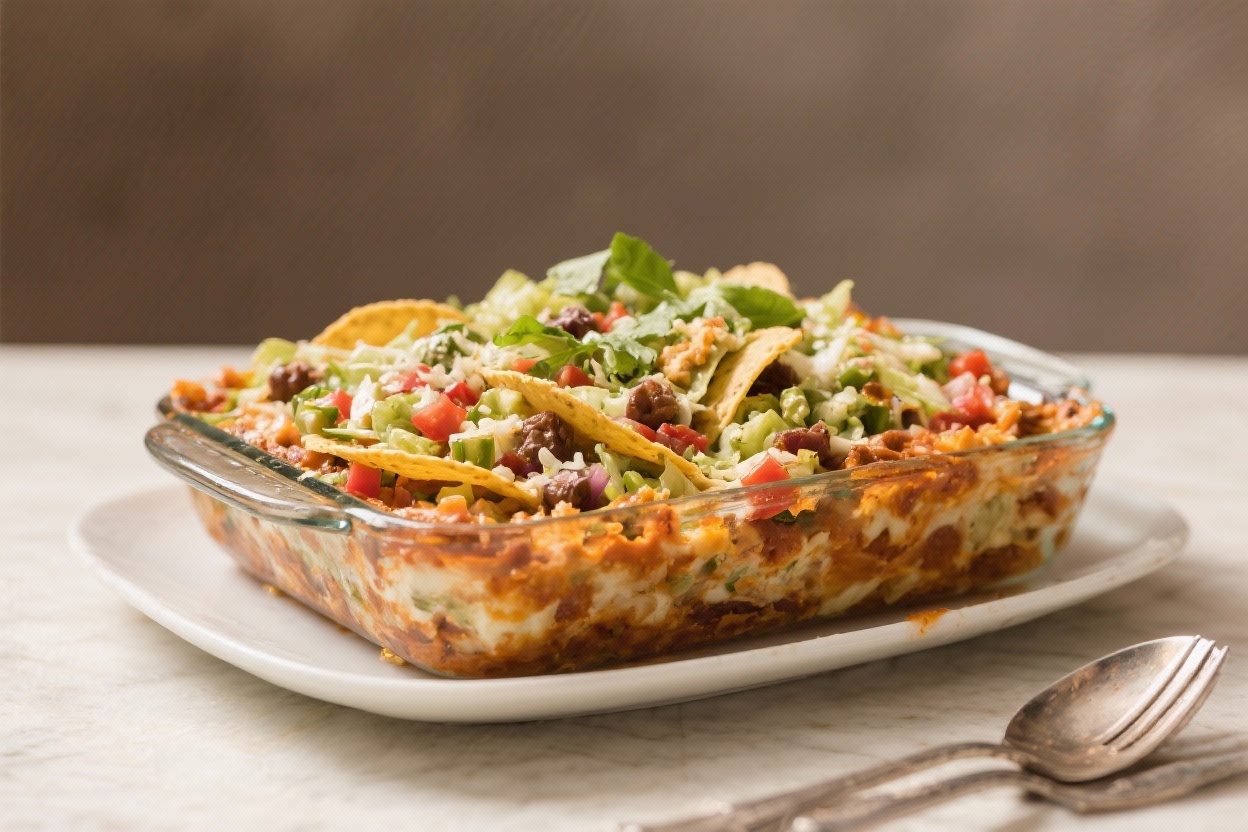
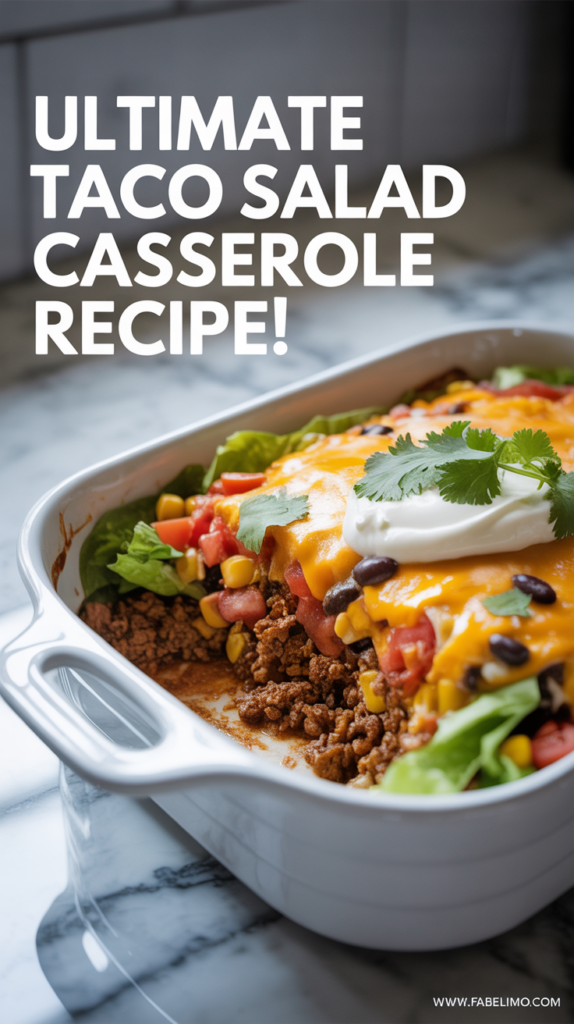
If you love taco night but want something warm, hearty, and easy to serve, this taco salad casserole hits the spot. It combines seasoned beef, beans, and salsa with crunchy chips, melty cheese, and fresh toppings for a casserole that feels fun and familiar. It’s great for busy weeknights, casual get-togethers, or game-day spreads.
You can customize it to match your taste, and it reheats well without getting soggy—if you store it right. Serve it hot from the oven and let everyone add their favorite toppings.
Ingredients
Method
- Preheat your oven to 375°F (190°C). Lightly grease a 9x13-inch baking dish.
- Warm the olive oil in a large skillet over medium heat. Add the onion and cook until softened, about 3–4 minutes. Stir in the garlic and cook 30 seconds.
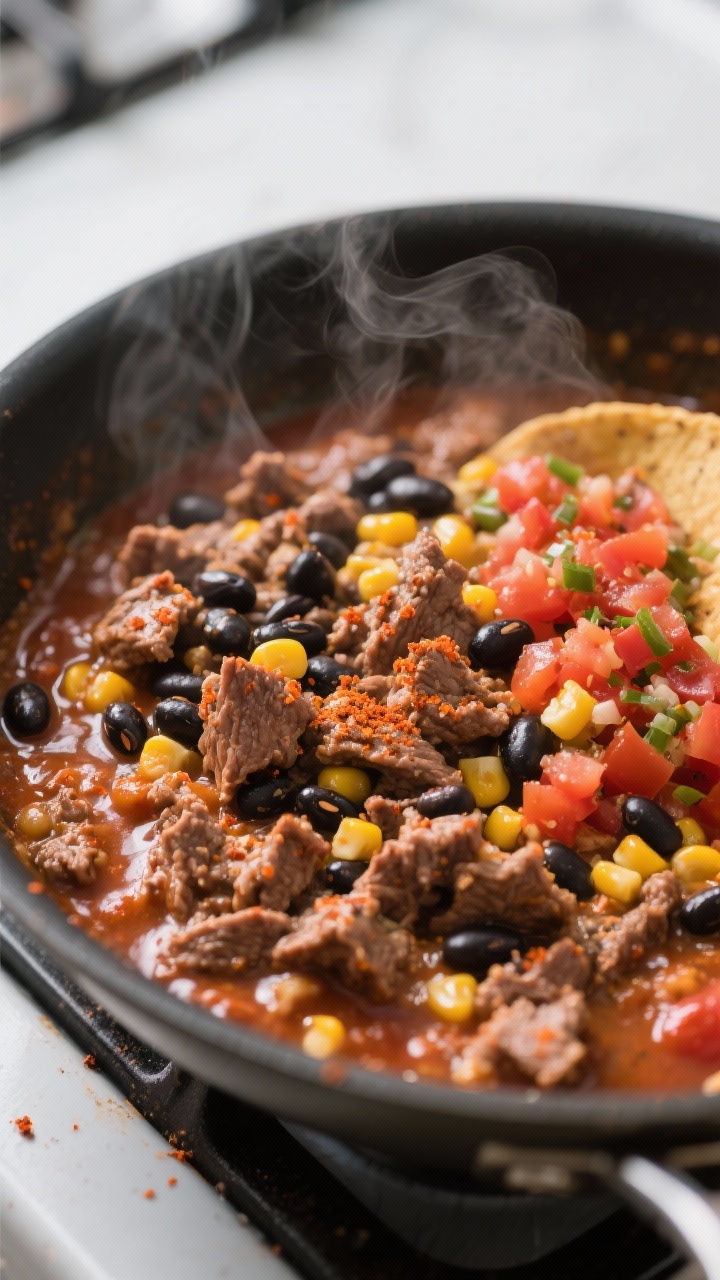
- Add the ground beef. Cook, breaking it up with a spatula, until browned and cooked through. Drain excess fat if needed.
- Sprinkle in the taco seasoning. Stir in the salsa, tomato sauce, black beans, and corn. Simmer 3–4 minutes, just until everything is hot and slightly thickened. Taste and season with salt and pepper.
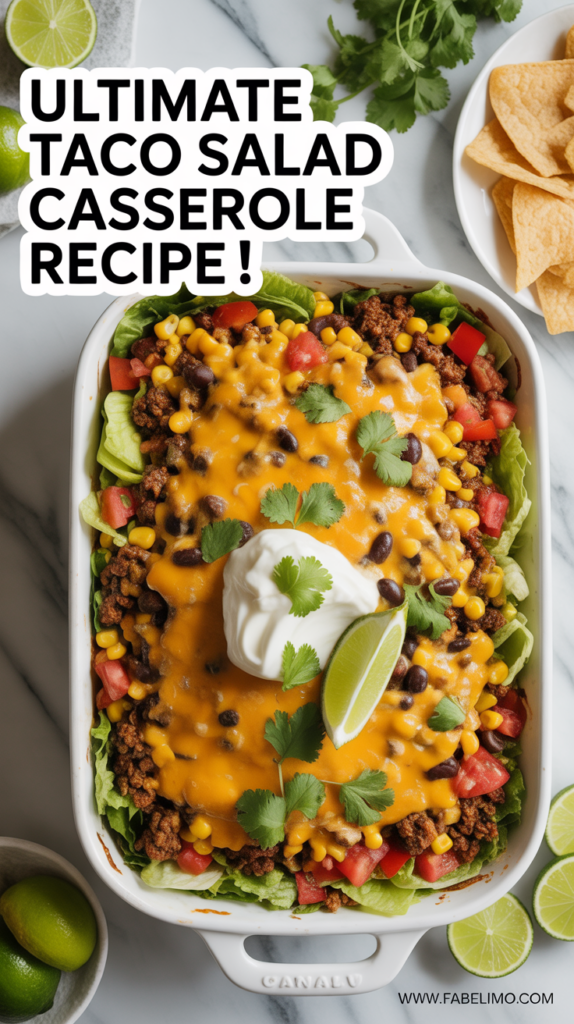
- Spread half the crushed tortilla chips in the baking dish. Top with half the meat mixture and half the cheese. Repeat with the remaining chips, meat, and cheese.
- Bake for 12–15 minutes, until the cheese is melted and bubbling.
- While it bakes, toss the shredded romaine and cherry tomatoes with a squeeze of lime and a pinch of salt to brighten the flavor.
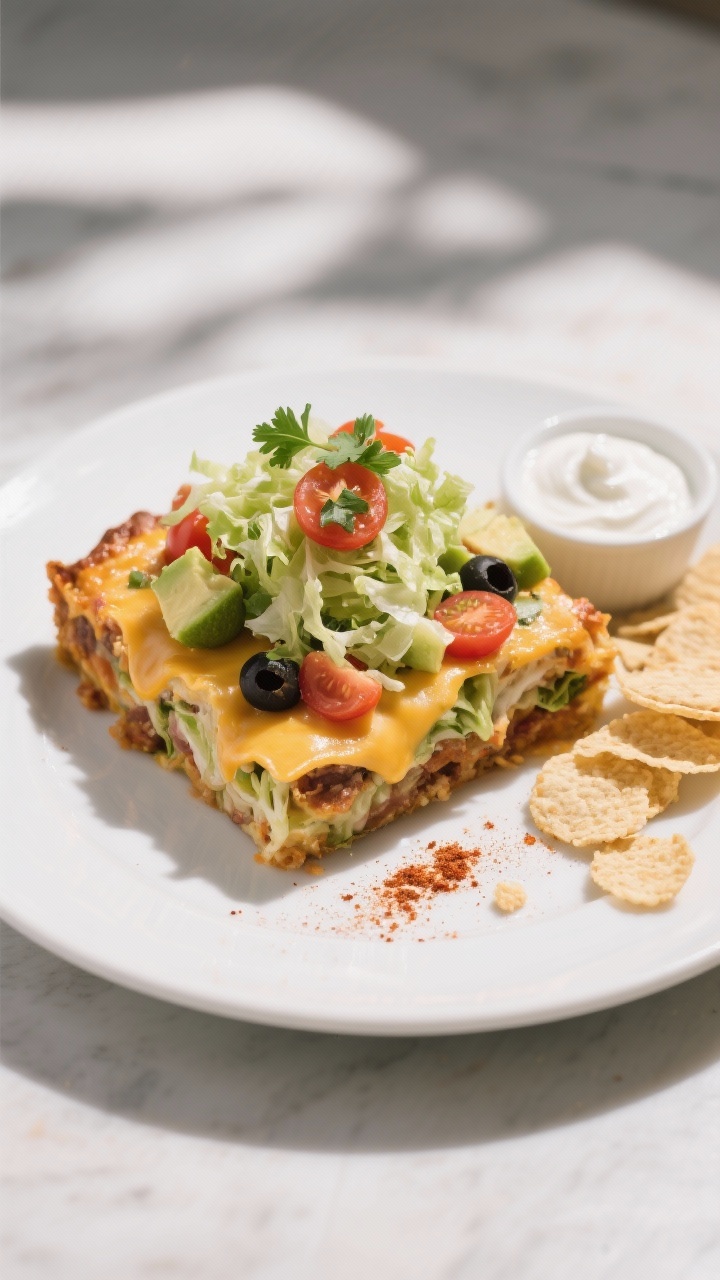
- Remove the casserole from the oven and let it rest 5 minutes. Top with the lettuce-tomato mix, olives, avocado, and cilantro.
- Serve with sour cream or Greek yogurt and extra lime wedges. Add hot sauce if you like more heat.
What Makes This Recipe So Good
- Big flavor with minimal effort: Taco seasoning, salsa, and melty cheese deliver tons of flavor without complicated steps.
- Perfect texture contrast: A crunchy chip layer meets warm, saucy beef and fresh, cool toppings.
- Feeds a crowd: One pan serves a family or a few friends, and you can easily double it.
- Flexible ingredients: Swap the protein, change the beans, or adjust the heat level to your liking.
- Make-ahead friendly: Assemble components in advance and bake when you’re ready.
What You’ll Need
- 1 pound ground beef (or ground turkey, chicken, or plant-based crumble)
- 1 small onion, diced
- 2 cloves garlic, minced
- 1 packet taco seasoning (or 2–3 tablespoons homemade)
- 1 can (15 ounces) black beans, drained and rinsed
- 1 cup corn kernels (frozen, canned, or fresh)
- 1 cup salsa (choose your heat level)
- 1/2 cup tomato sauce (or crushed tomatoes)
- 2 cups shredded cheese (cheddar, Monterey Jack, or a Mexican blend)
- 4 cups shredded romaine (for topping after baking)
- 2 cups cherry tomatoes, halved
- 1/2 cup sliced black olives (optional)
- 1/2 cup sour cream or Greek yogurt (for serving)
- 1/4 cup chopped cilantro (optional)
- 1 avocado, diced or sliced (optional)
- 3–4 cups tortilla chips or tostada shells, roughly crushed
- 1 tablespoon olive oil
- Salt and pepper, to taste
- Lime wedges, for serving (optional)
Instructions
- Preheat your oven to 375°F (190°C). Lightly grease a 9×13-inch baking dish.
- Warm the olive oil in a large skillet over medium heat.
Add the onion and cook until softened, about 3–4 minutes. Stir in the garlic and cook 30 seconds.
- Add the ground beef. Cook, breaking it up with a spatula, until browned and cooked through.
Drain excess fat if needed.
- Sprinkle in the taco seasoning. Stir in the salsa, tomato sauce, black beans, and corn. Simmer 3–4 minutes, just until everything is hot and slightly thickened.
Taste and season with salt and pepper.
- Spread half the crushed tortilla chips in the baking dish. Top with half the meat mixture and half the cheese. Repeat with the remaining chips, meat, and cheese.
- Bake for 12–15 minutes, until the cheese is melted and bubbling.
- While it bakes, toss the shredded romaine and cherry tomatoes with a squeeze of lime and a pinch of salt to brighten the flavor.
- Remove the casserole from the oven and let it rest 5 minutes.
Top with the lettuce-tomato mix, olives, avocado, and cilantro.
- Serve with sour cream or Greek yogurt and extra lime wedges. Add hot sauce if you like more heat.
How to Store
- Short-term: Store leftovers covered in the fridge for up to 3 days. For best texture, remove fresh toppings before refrigerating and add them again after reheating.
- Reheating: Warm in a 325°F (165°C) oven until hot, about 15–20 minutes.
You can also microwave in short bursts. Add fresh toppings after reheating.
- Make-ahead tips: Prepare the meat mixture up to 2 days ahead and store it in the fridge. Assemble and bake right before serving for maximum crunch.
- Freezing: Freeze the meat-and-bean mixture (without chips or lettuce) for up to 2 months.
Thaw, assemble with chips and cheese, then bake and finish with fresh toppings.
Benefits of This Recipe
- Balanced meal in one pan: Protein, fiber from beans, and fresh veggies all in one dish.
- Budget-friendly: Uses pantry staples like beans, salsa, and corn to stretch the protein.
- Kid-friendly flavors: Familiar taco taste with mild spice and melty cheese.
- Customizable nutrition: Swap Greek yogurt for sour cream, choose lean protein, and load up on lettuce and tomatoes.
- Time saver: Comes together quickly and simplifies serving and cleanup.
Common Mistakes to Avoid
- Adding lettuce before baking: Lettuce should go on after baking so it stays crisp.
- Too much liquid: If your salsa is very watery, simmer the meat mixture a few extra minutes to thicken it. This keeps the chips from getting soggy.
- Skipping the rest: Let the casserole sit for 5 minutes after baking so it sets slightly. It serves more neatly.
- Overbaking: The goal is melted cheese, not dried-out edges.
Check at 12 minutes.
- Adding all toppings to leftovers: Keep fresh toppings separate so they don’t wilt when reheated.
Variations You Can Try
- Chicken taco casserole: Use shredded rotisserie chicken instead of beef. Stir it in with the salsa and beans just to warm through.
- Vegetarian: Skip the meat and double the beans. Add sautéed bell peppers and zucchini for extra color and texture.
- Spicy upgrade: Use hot salsa, add diced jalapeños, and sprinkle with pepper jack cheese.
- Nacho-style: Swap tortilla chips for thick-cut restaurant-style chips and add a drizzle of queso before baking.
- Low-carb: Replace chips with a bottom layer of roasted cauliflower or riced cauliflower.
Add crushed pork rinds on top after baking for crunch.
- Breakfast twist: Add scrambled eggs and a little chorizo. Top with pico de gallo and avocado.
- Street-corn flair: Mix corn with a spoonful of mayo, lime juice, chili powder, and cotija. Spoon over the casserole just before serving.
FAQ
Can I make this casserole ahead of time?
Yes, prep the meat mixture up to 2 days in advance.
Wait to assemble with chips and cheese until right before baking so the chips stay crisp. Add fresh toppings after it comes out of the oven.
What kind of chips work best?
Sturdy tortilla chips or broken tostada shells hold up best. Thin, super-light chips can get soggy quickly.
How can I make it lighter?
Use lean ground turkey, reduce the cheese to 1 cup, choose Greek yogurt instead of sour cream, and add extra lettuce and tomatoes on top.
You can also swap half the chips for roasted cauliflower.
Is this spicy?
It depends on your salsa and taco seasoning. For mild, choose mild salsa and standard seasoning. For heat, use hot salsa and add jalapeños or hot sauce.
Can I use refried beans?
Absolutely.
Spread a layer of warmed refried beans over the chip layer or mix them into the meat mixture. If it seems thick, loosen with a few tablespoons of water or broth.
What cheese melts best?
Cheddar, Monterey Jack, or a Mexican blend melt smoothly and add great flavor. Pepper jack adds heat, and Oaxaca or Chihuahua cheese give a stretchy melt.
How do I keep the lettuce from wilting?
Dry it well and add it right before serving.
A quick toss with lime juice and a pinch of salt adds flavor without making it soggy.
Wrapping Up
Taco salad casserole brings the spirit of taco night to one bubbling pan. It’s fast, flexible, and easy to serve, with room for everyone to customize their plate. Keep the components simple, save the fresh toppings for the end, and you’ll get that perfect mix of warm, cheesy comfort and crisp, bright freshness every time. Whether you’re feeding family or friends, this one earns repeat status. Enjoy it tonight—and keep the hot sauce on the table.
Printable Recipe Card
Want just the essential recipe details without scrolling through the article? Get our printable recipe card with just the ingredients and instructions.