Love the taste of classic eclair dessert but want to keep things low-carb? This keto eclair cake gives you all the creamy, chocolate-topped goodness without the sugar crash. It’s easy to assemble, requires no oven, and tastes even better the next day.
If you’re craving something rich, cool, and satisfying, this one hits the spot. Serve it at gatherings or keep it in the fridge for a weeknight treat.
Ingredients
Method
- Prep the dish: Line your baking dish with parchment paper, making a sling so you can lift the cake out later. This helps with clean slices.
- Make the cookie layer mixture: In a bowl, whisk almond flour, coconut flour, powdered sweetener, baking powder, and salt. Stir in melted butter, egg, and vanilla. Mix until a soft dough forms.
- Create two thin layers: Divide the dough in half. Press one half evenly into the bottom of the dish to form a thin, even crust. Set the other half aside for the top layer.
- Par-chill the base: Chill the bottom layer for 15–20 minutes while you make the filling. This helps it firm up and makes assembly easier.
- Optional: Bloom the gelatin: If you want a firmer slice, sprinkle gelatin over 3 tablespoons of cold water. Let it bloom for 5 minutes, then warm gently in the microwave for 10–15 seconds until melted. Set aside to cool slightly.
- Beat the filling base: In a large bowl, beat softened cream cheese, powdered sweetener, and vanilla until smooth and fluffy.
- Whip the cream: In a separate bowl, beat the cold heavy cream to stiff peaks. If using gelatin, stream the lukewarm melted gelatin into the whipping cream as you mix on low, then finish to firm peaks.
- Combine: Fold the whipped cream into the cream cheese mixture in two additions until smooth and airy. Taste and adjust sweetness if needed.
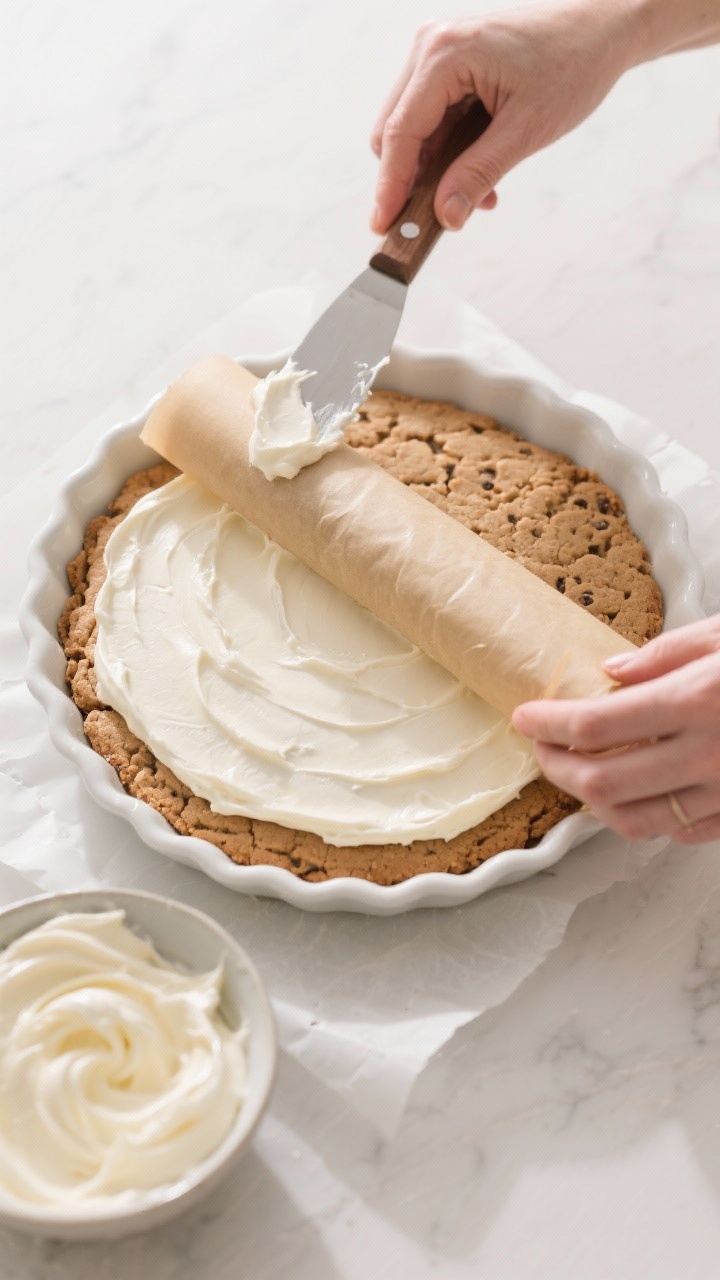
- Layer the filling: Spread half of the filling over the chilled bottom layer. Smooth the top.
- Add the second cookie layer: Press the reserved dough between two sheets of parchment into a thin rectangle the size of your dish. Peel off one sheet and flip onto the filling. Gently peel off the other sheet. Patch as needed. Top with the remaining filling and smooth the surface.
- Chill to set: Refrigerate for at least 3–4 hours, or until the filling is well set. Overnight gives the cleanest slices.
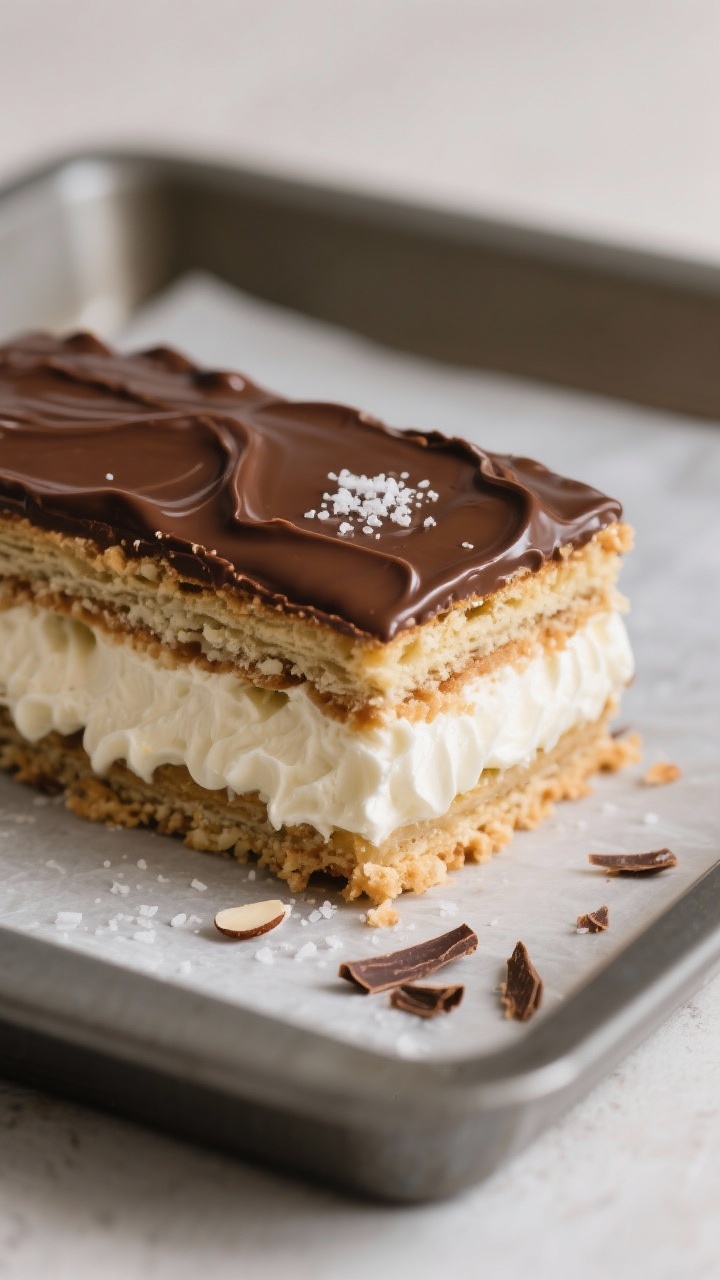
- Make the ganache: Heat heavy cream until steaming (not boiling). Pour over chocolate chips with butter and a pinch of salt. Let sit 2 minutes, then whisk until glossy.
- Finish the cake: Pour ganache over the chilled cake and spread evenly. Chill 30–45 minutes more until the top is set but sliceable.
- Slice and serve: Lift using the parchment sling, cut into squares, and enjoy.
What Makes This Special
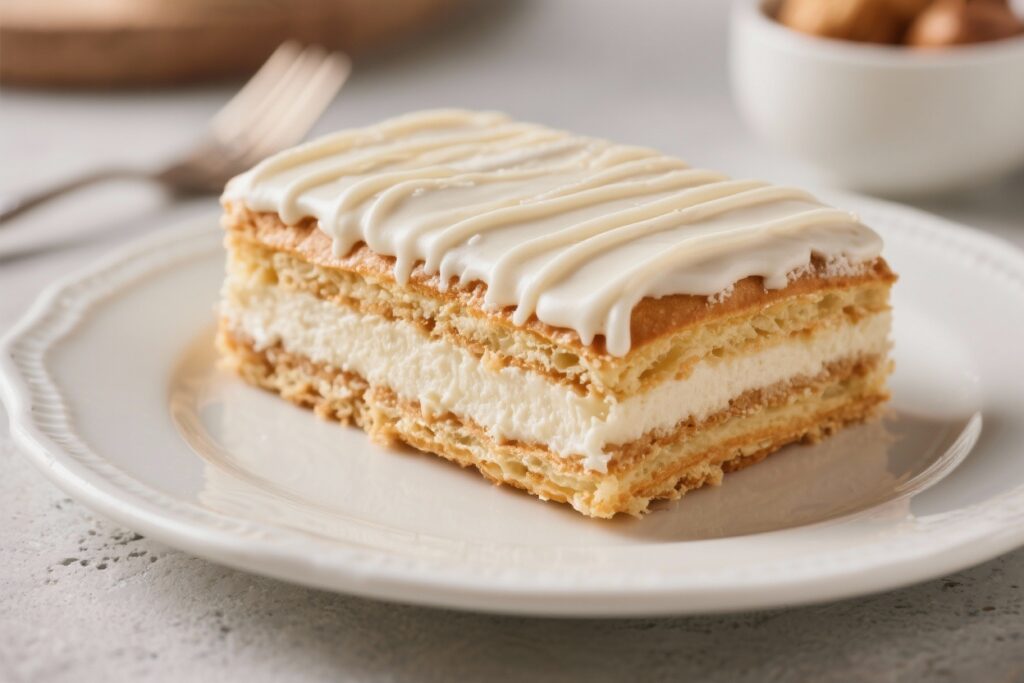
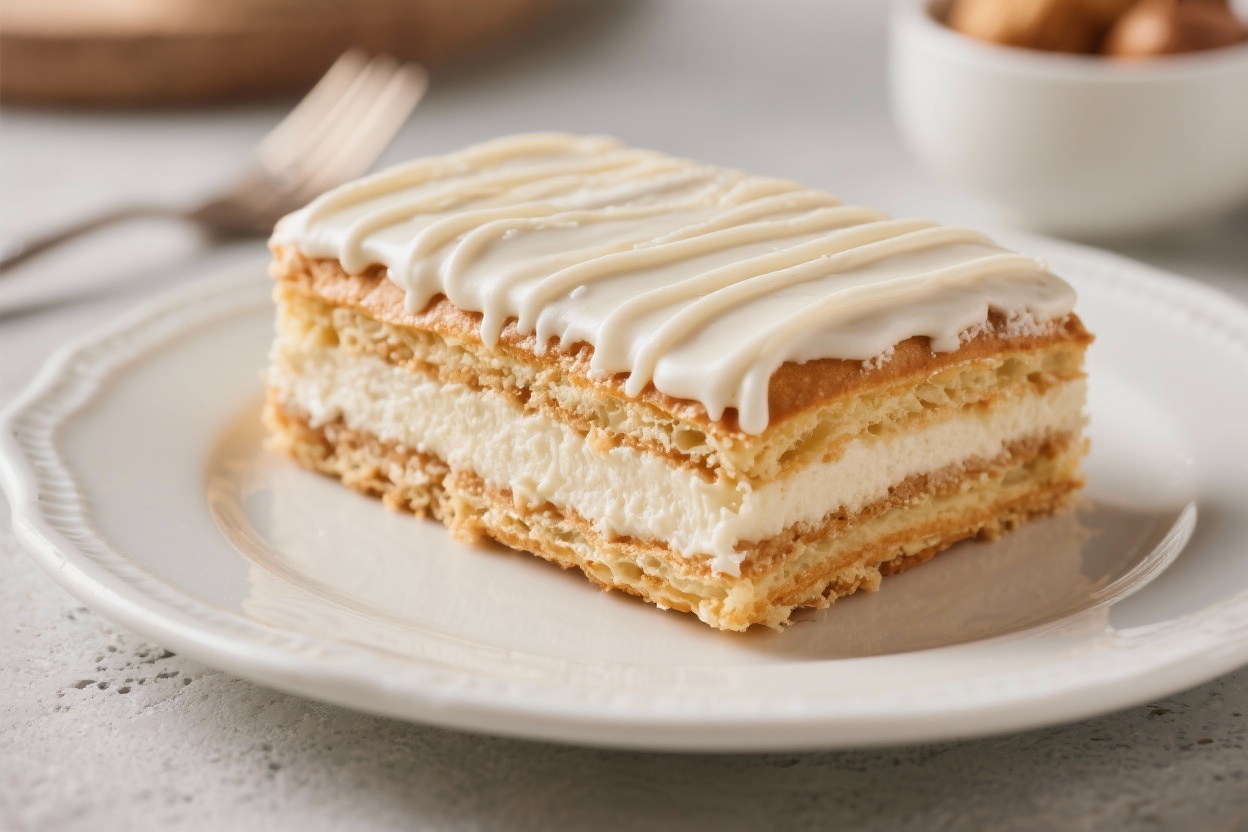
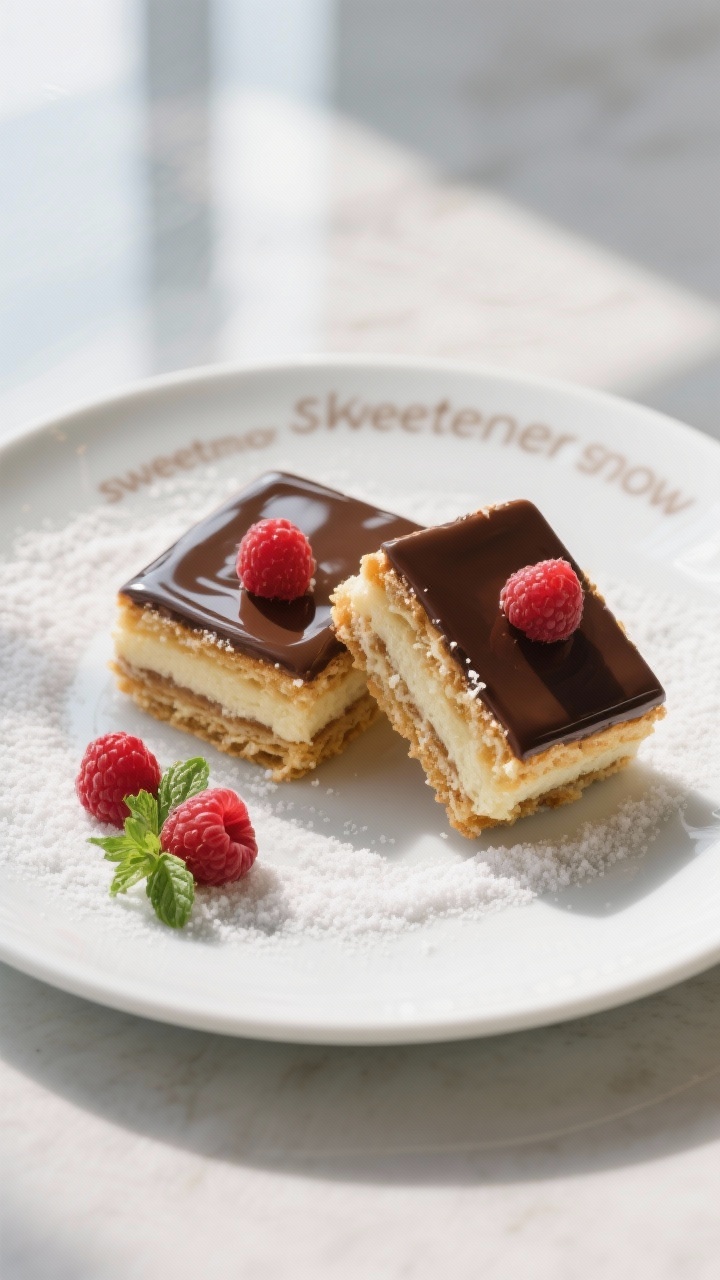
This cake captures the spirit of a traditional eclair—layers of custard-like filling, a soft “cookie” base, and a glossy chocolate topping—without wheat flour or sugar. Instead of graham crackers or pastry, we use almond flour and a touch of coconut flour to create a tender, cookie-like layer.
The filling is smooth and creamy thanks to cream cheese and heavy cream. A simple chocolate ganache finishes it off with a glossy snap and deep cocoa flavor. It’s decadent but still keto-friendly, gluten-free, and no-bake.
What You’ll Need
- For the “cookie” layers:
- 2 cups blanched almond flour
- 2 tablespoons coconut flour
- 1/3 cup powdered erythritol or allulose (to taste)
- 1/2 teaspoon baking powder
- 1/4 teaspoon fine sea salt
- 4 tablespoons unsalted butter, melted
- 1 large egg
- 1 teaspoon vanilla extract
- For the filling:
- 8 ounces cream cheese, softened
- 1/2 cup powdered erythritol or allulose, plus more to taste
- 2 teaspoons vanilla extract
- 2 cups heavy whipping cream, cold
- 1 box (about 1 ounce) unflavored gelatin, optional for extra firmness
- 3 tablespoons water (for blooming gelatin, if using)
- For the chocolate ganache:
- 3/4 cup sugar-free chocolate chips (dark or milk-style)
- 1/2 cup heavy cream
- 1 tablespoon butter
- Pinch of salt
- Tools:
- 9×9-inch or 8×10-inch baking dish
- Electric mixer
- Mixing bowls
- Spatula
- Parchment paper
Step-by-Step Instructions
- Prep the dish: Line your baking dish with parchment paper, making a sling so you can lift the cake out later.
This helps with clean slices.
- Make the cookie layer mixture: In a bowl, whisk almond flour, coconut flour, powdered sweetener, baking powder, and salt. Stir in melted butter, egg, and vanilla. Mix until a soft dough forms.
- Create two thin layers: Divide the dough in half.
Press one half evenly into the bottom of the dish to form a thin, even crust. Set the other half aside for the top layer.
- Par-chill the base: Chill the bottom layer for 15–20 minutes while you make the filling. This helps it firm up and makes assembly easier.
- Optional: Bloom the gelatin: If you want a firmer slice, sprinkle gelatin over 3 tablespoons of cold water.
Let it bloom for 5 minutes, then warm gently in the microwave for 10–15 seconds until melted. Set aside to cool slightly.
- Beat the filling base: In a large bowl, beat softened cream cheese, powdered sweetener, and vanilla until smooth and fluffy.
- Whip the cream: In a separate bowl, beat the cold heavy cream to stiff peaks. If using gelatin, stream the lukewarm melted gelatin into the whipping cream as you mix on low, then finish to firm peaks.
- Combine: Fold the whipped cream into the cream cheese mixture in two additions until smooth and airy.
Taste and adjust sweetness if needed.
- Layer the filling: Spread half of the filling over the chilled bottom layer. Smooth the top.
- Add the second cookie layer: Press the reserved dough between two sheets of parchment into a thin rectangle the size of your dish. Peel off one sheet and flip onto the filling.
Gently peel off the other sheet. Patch as needed. Top with the remaining filling and smooth the surface.
- Chill to set: Refrigerate for at least 3–4 hours, or until the filling is well set.
Overnight gives the cleanest slices.
- Make the ganache: Heat heavy cream until steaming (not boiling). Pour over chocolate chips with butter and a pinch of salt. Let sit 2 minutes, then whisk until glossy.
- Finish the cake: Pour ganache over the chilled cake and spread evenly.
Chill 30–45 minutes more until the top is set but sliceable.
- Slice and serve: Lift using the parchment sling, cut into squares, and enjoy.
Keeping It Fresh
This cake keeps well in the fridge for up to 5 days. Cover tightly with plastic wrap or store in an airtight container to prevent the ganache from picking up fridge odors. For longer storage, freeze individual slices for up to 2 months.
Thaw overnight in the fridge before serving. The texture remains creamy, and the cookie layers stay tender.
Benefits of This Recipe
- Low-carb and sugar-free: Uses keto-friendly sweeteners and flours, so you can enjoy dessert without a blood sugar spike.
- No-bake and make-ahead: Perfect for busy schedules. It sets in the fridge and tastes better the next day.
- Gluten-free: Almond and coconut flour stand in for wheat, making it suitable for gluten-free diets.
- Customizable sweetness: Adjust the sweetener to your preference without changing the texture.
- Crowd-pleasing flavor: Creamy vanilla filling and chocolate topping feel classic and indulgent.
Pitfalls to Watch Out For
- Over-sweetening: Keto sweeteners can taste stronger than sugar.
Start with less and add more after tasting the filling.
- Runny filling: Whip the cream to stiff peaks and fully chill the cake. If you live in a warm climate or want sharp slices, use the gelatin.
- Thick cookie layers: Keep them thin so the dessert eats like a classic eclair cake. Press and roll evenly.
- Grainy ganache: Don’t boil the cream.
Let the chocolate rest under hot cream before whisking for a silky finish.
- Using the wrong sweetener form: Make sure it’s powdered for the filling to avoid grittiness.
Recipe Variations
- Mocha Eclair Cake: Add 1–2 teaspoons espresso powder to the ganache and 1 teaspoon to the filling for a coffee kick.
- Peanut Butter Twist: Beat 1/3 cup natural peanut butter into the cream cheese mixture and reduce sweetener slightly.
- Chocolate Filling: Fold 2 tablespoons unsweetened cocoa powder into the filling and add an extra tablespoon of sweetener to balance.
- Berry Layer: Add a thin layer of sliced strawberries or raspberries between the filling layers. Keep portions moderate to stay low-carb.
- Vanilla Bean Deluxe: Swap vanilla extract for vanilla bean paste for a deeper, bakery-style flavor.
- Dairy-Light Option: Use coconut cream in place of heavy cream and a dairy-free cream cheese alternative. The texture will be softer, so use gelatin.
FAQ
Can I use a different sweetener?
Yes.
Allulose and powdered erythritol both work well. Allulose tastes closer to sugar and gives a softer set, while erythritol is sweeter but can have a cooling effect. Avoid granulated forms in the filling unless you can blitz them to a powder.
What size pan works best?
A 9×9-inch square dish gives nice height and clean layers.
An 8×10-inch also works. For a 9×13-inch pan, increase the recipe by about 1.5x.
Do I have to use gelatin?
No, but it helps the cake slice neatly, especially in warm kitchens or for parties. Without gelatin, chill overnight for the best texture.
Can I bake the cookie layers?
You can.
Press each half onto a parchment-lined sheet, bake at 325°F (163°C) for 8–10 minutes until just set, cool completely, then assemble. Baking gives a slightly firmer bite.
How do I prevent the ganache from cracking?
Pour it over a well-chilled filling, but don’t let it get rock hard before slicing. If it’s too firm, let the cake sit at room temperature for 10–15 minutes before cutting.
Is this truly keto?
It’s low in net carbs when made with almond and coconut flours and sugar-free sweeteners.
Always check your specific products and portion sizes to fit your macros.
Can I make it ahead?
Yes. It’s even better the next day. Assemble, chill overnight, and add the ganache the morning of serving for a pristine finish.
How many servings does this make?
In a 9×9-inch pan, you’ll get about 12 generous squares.
For smaller portions or tighter macros, cut into 16 pieces.
Final Thoughts
This Keto Eclair Cake delivers everything you want in a classic dessert—creamy filling, tender layers, and a shiny chocolate top—without the sugar and flour. It’s simple to prepare, forgiving, and easy to customize. Keep it chilled, slice it clean, and enjoy a bakery-style treat that fits your low-carb lifestyle.

Printable Recipe Card
Want just the essential recipe details without scrolling through the article? Get our printable recipe card with just the ingredients and instructions.